
Foundations · Track 1 · Tutorial 2 of 6
Build your group structure
Set up the shape of your group: the companies in it and how their figures add up to group totals. Everything else in BrizoConsol builds on this.
1Start your group
Your group is the top of the structure: it has no figures of its own and adds up everything beneath it. There are two ways to create it, depending on where you are.
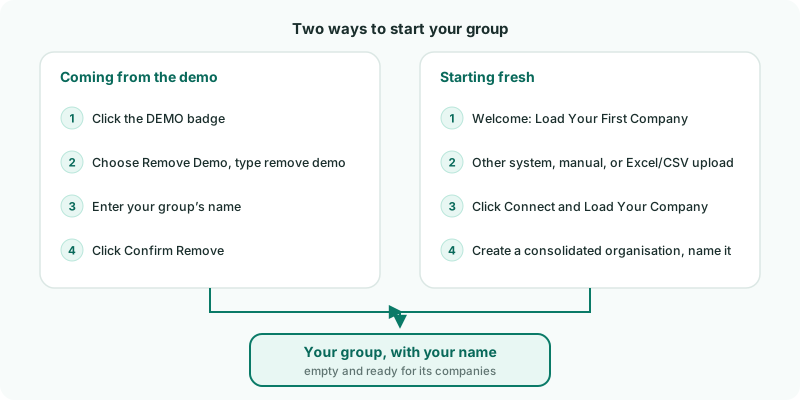
| Coming from the demo | Click the DEMO badge and choose Remove Demo. Type remove demo, enter your group’s name in New top company name, and click Confirm Remove. The demo companies and their data are deleted, and the demo group becomes your empty group under the new name. |
|---|---|
| Starting fresh | On the Welcome screen, select Load Your First Company, choose Other system, manual, or Excel/CSV upload, and click Connect and Load Your Company. Then click Create a consolidated organisation, enter your group’s name and click Add. |
Remove Demo cannot be undone. If you want to keep exploring the demo, finish Take a tour with the demo group first.
2Set the group’s currency and year
- Make sure your group is selected in the entity selector.
- Open Settings → Organisation Settings → Organisation Details.
- Set Presentation Currency — the currency your group reports in.
- Set Fiscal Year Start Month — the month the group’s financial year begins.
Set both before any figures are loaded: every reporting period follows them, and changing them later means the figures have to be worked out again.
A company whose year starts in a different month from the group is handled for you — see Fiscal Year Alignment.
3Sketch the shape: companies and groups
The structure is built from two kinds of building block:
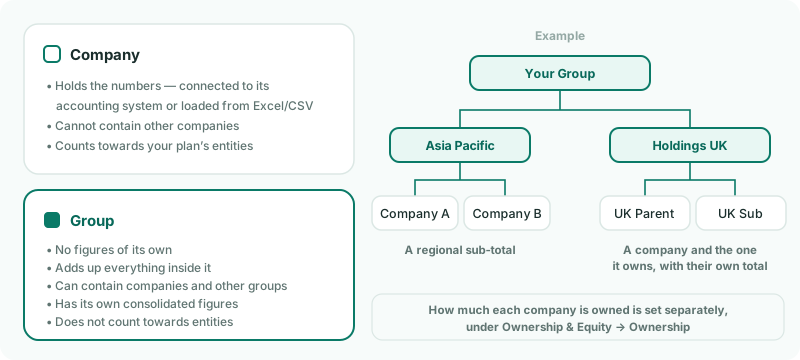
| Company | A business with its own books — connected to its accounting system or loaded from Excel or CSV. A company cannot contain other companies, and each one counts towards the number of entities your plan allows. |
|---|---|
| Group | Has no figures of its own; it adds up everything inside it. A group can contain companies and other groups, gets its own consolidated figures, and appears in the entity selector. Groups do not count towards your entities. |
Use a group wherever you want a sub-total — a region, a division, or a company together with the companies it owns. If you only need one total, put every company directly under your group.
Who owns how much
The structure decides how figures add up. How much of each company the group owns is recorded separately, under Ownership & Equity → Ownership, and is covered in the Close the month track.
4Open the Organisation Hierarchy
- Open Settings → Global Settings → Organisation Hierarchy.
The tree on the left shows your group at the top. Click anything in it to see its details on the right.
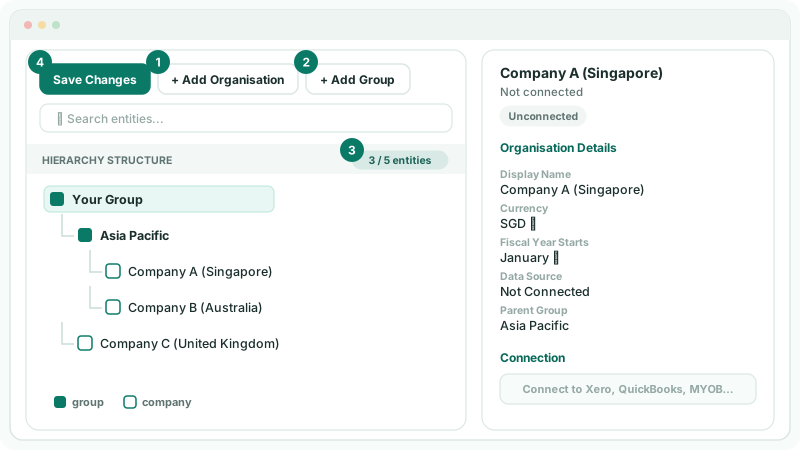
| 1 · + Add Organisation | Adds a company. |
|---|---|
| 2 · + Add Group | Adds a group. |
| 3 · Entity counter | How many companies you have, against how many your plan allows. |
| 4 · Save Changes | Keeps your changes. Nothing you add, move or delete in the tree is kept until you save. |
5Add your companies
- In the tree, click the group the company belongs in — to begin with, your group at the top.
- Click + Add Organisation.
- Check the Under line shows the right group, type the company’s name and click Add organisation.
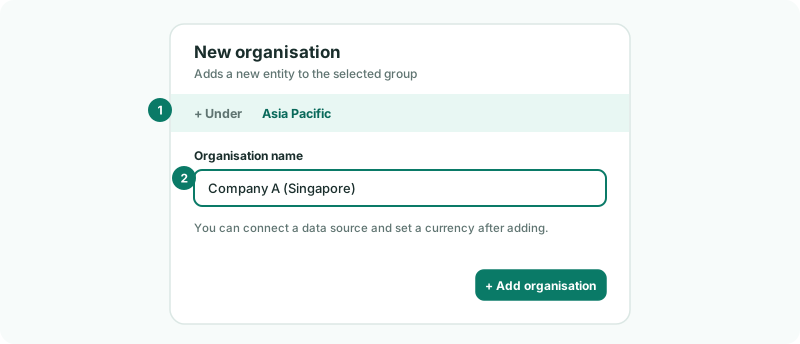
Repeat for each company. Use the name you want to see in reports — you can rename it later from Actions on the right.
If a company is selected when you click + Add Organisation, the new company goes into the same group as the selected one. When you reach your plan’s limit, the button is turned off.
6Add groups for sub-totals
Skip this step if every company sits directly under your group.
- Click the group the new group should sit in.
- Click + Add Group, type a name and click Add.
- Drag each company that belongs in the new group onto it.
You can drag companies and groups around the tree at any time to change the structure.
7Save, then finish each company
- Click Save Changes and confirm.
- Click each company in the tree and check its Currency and Fiscal Year Starts.
For a company you will load from Excel or CSV, set both here with the edit icon. For a company you will connect to Xero, QuickBooks Online, MYOB or Zoho Books, leave them: they are taken from the accounting system when you connect.
Each new company shows an Unconnected badge. That is expected — connecting them is the next tutorial.
Check
Every company in your group appears once in the tree, inside the right group; the entity counter matches the number of companies; and the structure is saved.
Want more detail? See the documentation