
Foundations · Track 1 · Tutorial 3 of 6
Bring in each company’s numbers
Get each company’s figures into BrizoConsol — automatically from its accounting system, or by uploading a trial balance file — and know how to tell when they are complete.
1Choose how each company’s numbers come in
Every company in your group needs its figures in BrizoConsol. There are two routes, and you choose per company — different companies in the same group can use different routes.
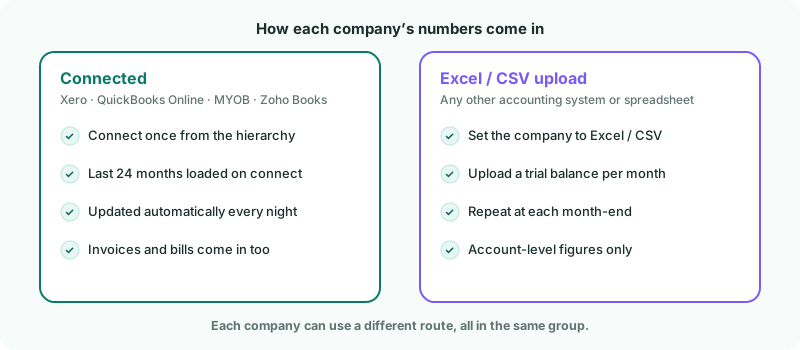
| Connected | For a company on Xero, QuickBooks Online, MYOB or Zoho Books. You connect it once; from then on its figures update automatically every night, and its invoices and bills come in too, for the receivables and payables views. |
|---|---|
| Excel / CSV upload | For a company on any other system — or kept in spreadsheets. You upload its trial balance each month. Uploads bring in account balances only, not invoices and bills. |
Example used in this tutorial
| Company A (Singapore) | Keeps its books in Xero → connect |
|---|---|
| Company B (Australia) | Keeps its books in QuickBooks Online → connect |
| Company C (United Kingdom) | Keeps its books in a system BrizoConsol does not connect to → upload |
Steps 2–4 cover connected companies; steps 5–8 cover uploads. Step 9 checks everything.
2Connect a company to its accounting system
- Open Settings → Global Settings → Organisation Hierarchy and click the company — for example Company A.
- In the Connection section on the right, click the button for its system: Connect to Xero, QuickBooks, Connect to MYOB or Connect to Zoho Books.
- You are taken to the accounting system. Sign in, choose the company that matches — your login may give you access to several — and allow access.
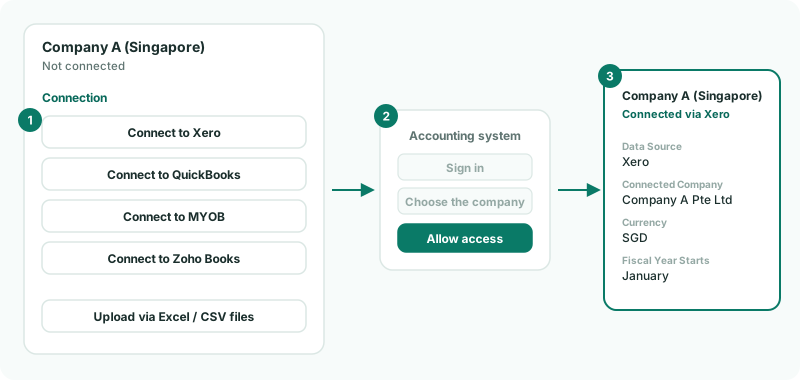
When you come back, the panel shows Connected via the system, the Connected Company name from the accounting system, and the company’s Currency and Fiscal Year Starts, which now come from there.
Check
The Connected Company is the one you meant. If you chose the wrong one, connect again and choose the right one.
The connection buttons stay off until the hierarchy has been saved — click Save Changes first if you have just added the company.
3Watch the first load
As soon as a company is connected, BrizoConsol starts loading its history in the background:
| Trial balances | The last 24 months. |
|---|---|
| Invoices and bills | The most recent months straight away; older months are filled in overnight. |
| After that | The company updates automatically every night. |
- Select the company in the entity selector.
- Open Settings → Organisation Settings → Data Loading.
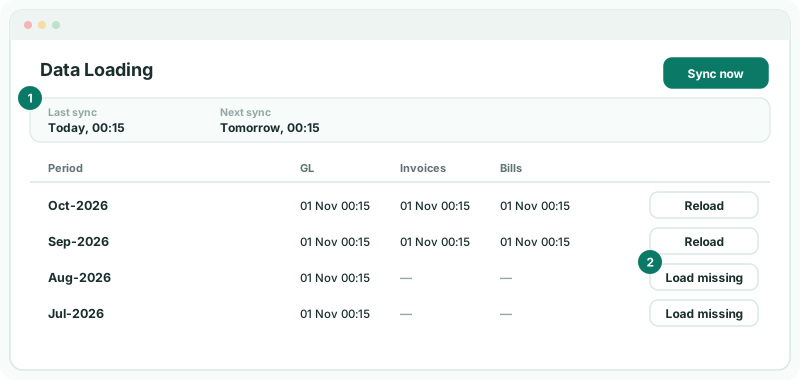
| Last sync / Next sync | When the company last updated, and when it updates next. |
|---|---|
| Period table | One row per month, showing when each kind of data — the trial balance (GL), invoices and bills — was last loaded. A month with nothing loaded yet has no time against it. |
| Load missing / Reload | Loads one month now — just what is missing, or everything again. |
| Sync now | Loads a range of months now, without waiting for the nightly update. Use it after changing something in the accounting system that you need to see today. |
Check
Once the first load has finished, the trial balance (GL) column shows a time for each of the months you want to report.
4Keep connections working
A connection relies on the access you gave in the accounting system. When something needs attention, the company shows a badge in Organisation Hierarchy:
| Unconnected | No data source yet. Connect it, or set it up for upload. |
|---|---|
| Token expiring | The access is about to run out. Click Reconnect and sign in again, so the nightly update is not interrupted. |
| Token expired | The access has run out and nothing is updating. Click Reconnect Now. |
| Data stale | The company has not updated recently. Check its Data Loading page, and reconnect if needed. |
If you reconnect and choose a different company in the accounting system, BrizoConsol stops and asks Connect a different … company? Your existing connection stays as it was unless you click Continue with selected company.
5Set up a company for upload
- In Organisation Hierarchy, click the company — for example Company C — and click Upload via Excel / CSV files in the Connection section.
- Check its Currency and Fiscal Year Starts in the panel, and set them with the edit icon if needed. An upload company does not get them from anywhere else.
- Click Load Data next to Data Source. This opens the company’s Data Loading page.
The panel now shows Connected via CSV.
6Prepare the trial balance file
From the company’s accounting system, export its trial balance as at the end of the month, as a CSV file:
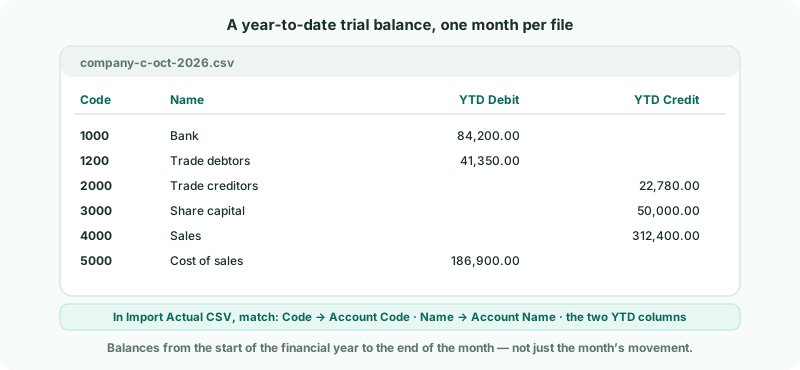
| Year to date | Balances from the start of the financial year to the end of the month — not just the month’s movement. |
|---|---|
| Debits and credits | In two separate columns. |
| One month per file | Name the files so you can tell the months apart; you choose each file’s month when you upload. |
If your export does not look like this — an Excel workbook, several sheets, one signed amount column, or monthly movements — use BrizoFileBot in step 8 instead.
7Upload with Import Actual CSV
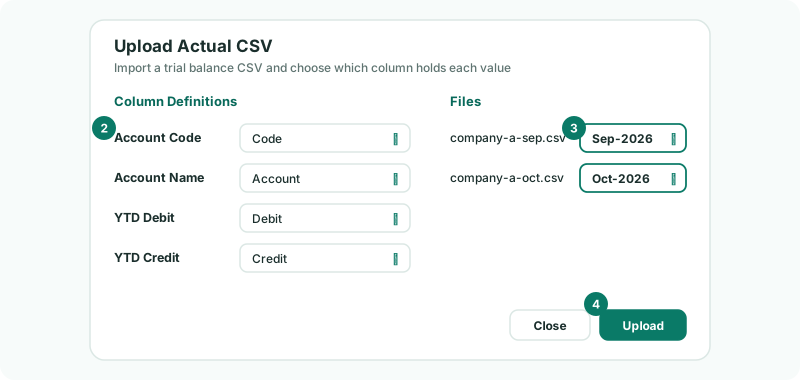
- On the company’s Data Loading page, click Import Actual CSV and drop in your files — up to 12 at once, 2 MB each.
- Under Column Definitions, choose which column holds the Account Code, Account Name, YTD Debit and YTD Credit.
- Under Files, choose the month for each file.
- Click Upload.
Uploading a month again replaces what was there for that month, so you can correct a file simply by uploading the right one.
8Or let BrizoFileBot read the file
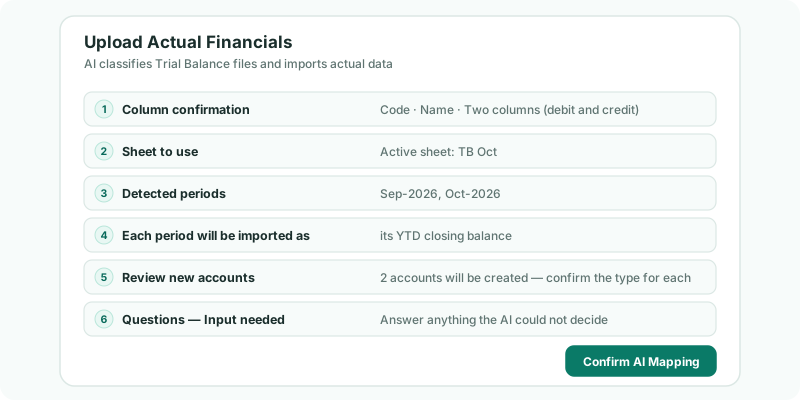
BrizoFileBot, on the same page, takes CSV, XLS, XLSX, TXT and TAB files and works out the layout for you. It is not available on the Standard plan.
- Click BrizoFileBot and drop in your files.
- Review what it found: the columns, the sheet it will use, the periods it detected, and whether each period is a year-to-date balance or a monthly movement.
- Confirm the type of any new accounts it will create, and answer any questions it asks.
- Click Confirm AI Mapping.
9Check every company
After an upload, BrizoConsol may offer to take you to account mapping. That is the next tutorial; choose Not now until every company is loaded.
| A month has no time against it | Connected: click Load missing on that row. Upload: upload that month’s file. |
|---|---|
| “Actual data can only be loaded from … to … for this edition.” | Your plan limits how far back figures can be loaded. Load only months inside the range shown, or change plan. |
| A file went into the wrong month | Upload the right file for that month — it replaces the old one. |
| A connected company stopped updating | Look for a badge in Organisation Hierarchy and reconnect — see step 4. |
Check
In Organisation Hierarchy, no company shows Unconnected or an expired token. On each company’s Data Loading page, every month you want to report has been loaded.
Want more detail? See the documentation