
Row/Column Reports · Track 1 · Tutorial 3 of 7
Add label, section, total and account rows
Most of a row/column report is section rows: a statement section or account type, shown with its accounts or as one total. Label rows give it headings, and an account row picks out a single account. Rows follow the chart of accounts, so a section picks up a new account on its own.
1Add a section with its accounts
- Open the Management P&L in the editor. Click the first blank row — click to configure — and choose Section.
- Search for and choose REVENUE, marked System section.
- Set Section display to Show detail. Row label shows the section’s name, REVENUE, and can’t be changed for a section shown in detail.
- Click Add Row.
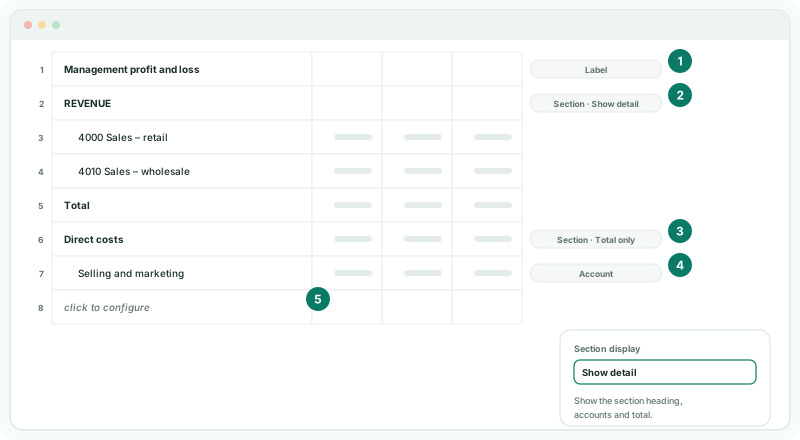
Show detail shows the section heading, every account in it, and the total. A new revenue account appears in the report the next time it is opened. Turn on Show empty, under Display, to keep accounts with no figures in the period; by default they are left out.
2Add a section as a total
- Click the next blank row and choose Section.
- Choose DIRECT COSTS, set Section display to Total only, and type Direct costs in Row label.
- Click Add Row.
Total only gives one row for the section total. The list also offers Chart account type entries: the account types in your chart of accounts, for a finer split than a statement section.
3Add a single account
- Click the next blank row and choose Account.
- Search for 6100 Selling & Marketing, choose it, and type Selling and marketing in Row label.
- Click Add Row.
An account row shows that one account. Use it when the line really is one account; for a line made of several, use a section, an account type or a tag, so new accounts are picked up. See Read accounts by accounting-standard tag.
4Add headings and space
- For a heading, add a Label row and type it in Label Text.
- For space above or below a row, click the row, click Before or After under Skip, and click Update Row.
A label must have text, so use Skip rather than an empty label for a blank line.
5Reorder, edit and delete rows
| Edit | Click the row, change it, and click Update Row. |
|---|---|
| Move | Drag the row by its handle to where it should go. |
| Delete | Click the row and click Delete Row. To delete several, select them by their row numbers and click Delete selected. |
Check
Click Save, then View. Revenue’s total and Direct costs match Reports → Profit & Loss for Your Group, month by month.
6If something goes wrong
| What you see | What to do |
|---|---|
| Add Row is greyed out on a section | Type a Row label. |
| Choose an account or tag and enter a row label. | Pick the account and type a Row label. |
| An account is missing from a section | It had no figures in the period. Tick Show empty to show it. |
| A section doesn’t match the statement | Check it is the System section, not a Chart account type of a similar name. |
Want more detail? See the documentation