
Intercompany Eliminations · Track 1 · Tutorial 3 of 5
Arrange the Intercompany menu
The Intercompany menu lists every type that is switched on, in a fixed order until you change it. Put the types into named groups, in the order your team works through them at month end. The arrangement is saved for the whole group.
1See how the menu is built
Open Intercompany in the sidebar. It always has the same frame:
| At the top | Elimination Rules, where the group’s rules are kept. |
|---|---|
| In the middle | One entry per intercompany type that is switched on. Each opens that type’s eliminations. This is the part you arrange. |
| At the bottom | Elimination Review, shown when something is waiting for review or a Method 4 rule is active. |
Until you arrange it, the middle part follows the order of the Intercompany Types page, and each type of your own sits directly after the built-in type it works like — Royalties after Management Charges.
2Plan the groups
Group the types the way your team talks about them. Your Group uses:
| Group | Types in it |
|---|---|
| Trading | Trade Receivables / Payables, Sales / Purchases / Services |
| Funding | Intercompany Loans |
| Charges | Management Charges, Royalties |
| — | Other Eliminations, left at the top level |
A group is one level only: it holds types, never another group. A type can sit in a group or at the top level, between groups.
3Add the groups
- Select Your Group and open Settings → Global Settings → Intercompany Types.
- Click Manage menu. Arrange the Intercompany menu opens, showing the types that are switched on.
- In Group name, enter Trading and click Add group. The group is added at the end of the list.
- Do the same for Funding and Charges.
A group name can be up to 80 characters, and no two groups can share a name, whatever the capitals.
4Move the types into place
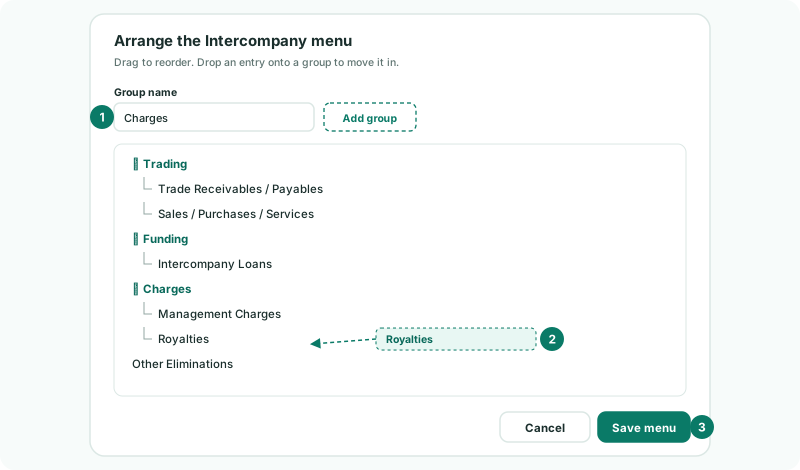
- Drag Trade Receivables / Payables onto Trading. Dropped on a group, an entry moves inside it, at the end.
- Drag Sales / Purchases / Services onto Trading, then Intercompany Loans onto Funding, and Management Charges and Royalties onto Charges.
- To change the order, drag an entry just above or below another one. Dropped there, it is placed beside it, inside the same group or at the top level.
- Drag the groups themselves into the order you want, with Other Eliminations last.
If a drop is not allowed — a group dropped into another group — the tree stays as it was and the dialog shows A group cannot hold another group, and a group name must be unique.
5Rename or remove a group
- Click the group in the tree. Its name appears in Group name, and the button becomes Rename group.
- To rename it, change the name and click Rename group. Its types stay inside.
- To remove it, click Remove group. Its types move to the top level, at the end; nothing is lost.
6Save the menu
- Click Save menu. The dialog closes once the arrangement is stored.
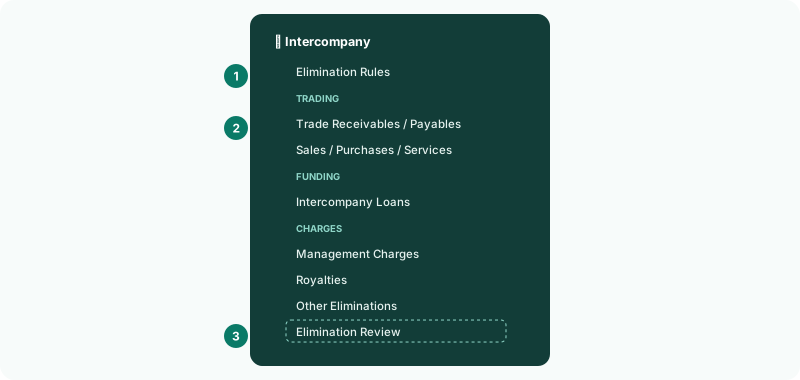
The sidebar updates at once, and everyone working on Your Group sees the same menu. Nothing else changes: rules, entries and figures are exactly as they were.
Check
Open Intercompany in the sidebar. Under Elimination Rules you see TRADING, FUNDING and CHARGES with their types in your order, Royalties directly under Management Charges, and Other Eliminations last.
7Know how the menu keeps up
| When | What happens in the menu |
|---|---|
| You add a type of your own | It appears directly after the built-in type it works like, in that type’s group. Open Manage menu to move it elsewhere. |
| You switch a type off | It leaves the menu and the dialog, but keeps its place. Switch it back on and it returns there. |
8If something goes wrong
| A type is not in the dialog | It is switched off. Only types that are switched on can be arranged; switch it on in Intercompany Types, then open Manage menu again. |
| Add group does nothing and the dialog shows the group message | A group with that name already exists. Choose another name. |
| A group’s types appeared at the bottom of the menu | The group was removed. Add it again and drag the types back in. |
| The arrangement was lost when the dialog closed | It was closed without Save menu. Arrange it again and save. |
| A colleague does not see Intercompany in the sidebar | The Intercompany menu needs the Administrator or Journals & Eliminations Admin role. |
Want more detail? See the documentation