
Foundations · Track 1 · Tutorial 6 of 6
Invite your team
Give each person their own login, with access to just what they need — the group’s reports, a company’s data loading, or month-end entries.
1Decide what each person needs
Every person gets one or more access roles. Choose the smallest role that covers their work.
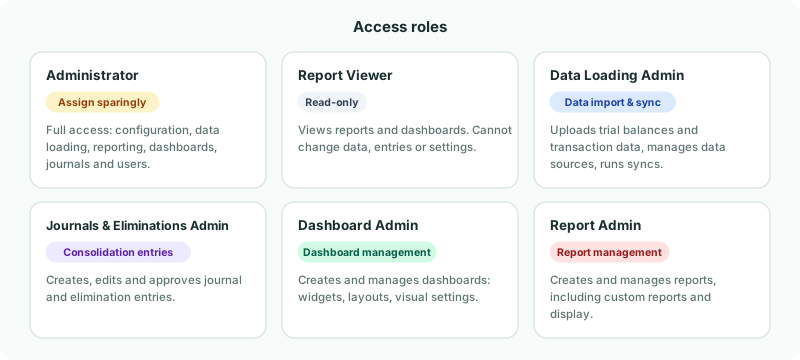
| Board member, investor | Report Viewer |
|---|---|
| Bookkeeper for one company | Data Loading Admin on that company |
| Group accountant | Journals & Eliminations Admin, plus Report Viewer to read the results |
| Analyst building reports | Report Admin and Dashboard Admin |
| Whoever runs BrizoConsol | Administrator — keep this to one or two people |
2Know where access applies
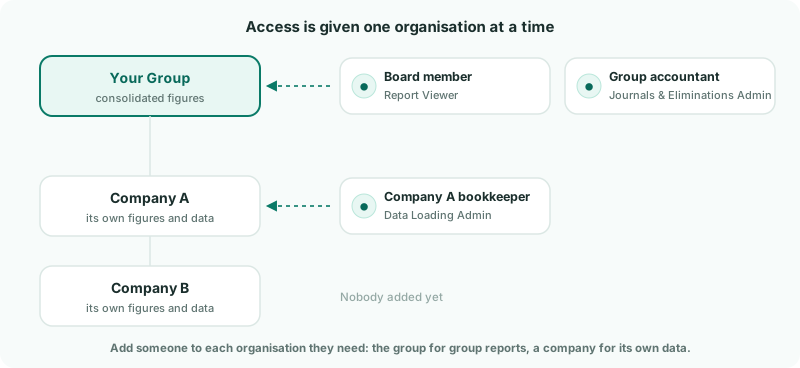
Access is given one organisation at a time. Someone added to your group can use the group’s consolidated reports; to work on a company’s own figures or data, they need adding to that company too.
3Plan who goes where
Before adding anyone, write down each person, the organisations they work on, and the role on each. For the running example:
| Person | Your Group | Company A, B, C |
|---|---|---|
| Board member | Report Viewer | — |
| Group accountant | Journals & Eliminations Admin, Report Viewer | — |
| Company C’s bookkeeper, who uploads its trial balance | — | Data Loading Admin on Company C only |
Each cell is one deployment you will add. Writing it down first means nobody gets more than they need, and nobody is left unable to do their job.
4Open User Deployment
- In the entity selector, choose the organisation you are giving access to — start with your group.
- Open Settings → Organisation Settings → User Deployment.
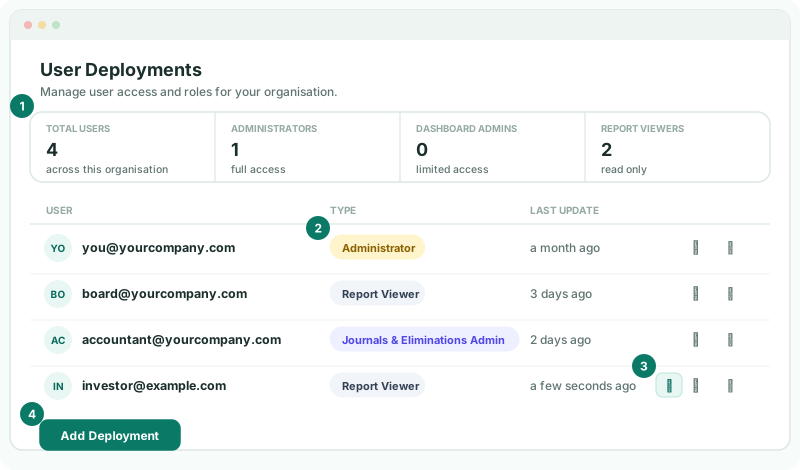
| 1 · Counts | How many people have access to this organisation, and how many are administrators, dashboard admins and report viewers. |
|---|---|
| 2 · Type | The role each person has here. Someone with two roles appears on two rows. |
| 3 · Resend invitation | Shown only for people who have not logged in yet. |
| 4 · Add Deployment | Gives a person a role on this organisation. |
On the Free plan, Add Deployment is disabled and the page shows Paid version is required to deploy to users., with a Subscribe to Deploy Users button.
5Add each person
- Click Add Deployment.
- Enter the person’s email.
- Choose their access right.
- Click Add deployment.
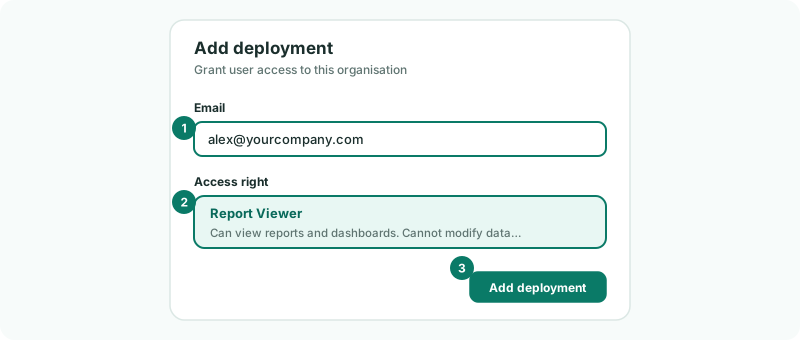
Work through your plan one cell at a time. For the group accountant, add the group twice: once as Journals & Eliminations Admin, once as Report Viewer. For Company C’s bookkeeper, switch the entity selector to Company C first, then add them there.
Each plan allows a set number of people across the whole group. If you are at the limit, adding someone new shows Cannot add users; giving another role to someone who already has access still works.
6Know what the person receives
| New to BrizoConsol | An email titled Welcome to BrizoConsol with their email address, a temporary password and a Log In to Your Account button. They are asked to set their own password after first logging in. |
|---|---|
| Already has an account | No email. The organisation simply appears in their entity selector the next time they log in — tell them it is there. |
If someone cannot find the welcome email, check their spam folder, then click Resend invitation on their row. It sends a new temporary password, and the old one stops working.
7Keep the list up to date
| Someone changes job | Click Edit on their row and choose the new access right. |
|---|---|
| Someone leaves | Click Delete on their row in every organisation they had access to. Deleting removes their access to that organisation only. |
| A company joins the group | Apart from the account owner, nobody can open its own figures until you add them on that company. |
Check
Switch the entity selector to each organisation in turn and open User Deployment. Every cell of your plan appears there, and nobody else does.
Want more detail? See the documentation