
Security · Track 2 · Tutorial 1 of 3
Give each person the right access
Everyone signs in with their own account, so every entry and change carries their name. The role decides what they can see and do, and it is given one organisation at a time.
1Choose the role from the job
| Administrator | Full system access: configuration, data loading, reporting, dashboards, journals and user management. Only Administrators see User Deployment, the System Audit Trail and the Lock button. Assign sparingly. |
|---|---|
| Report Viewer | Views reports and dashboards. Can’t change data, post entries or change settings. For the board, investors and managers. |
| Data Loading Admin | Uploads trial balances and other data, manages data sources and runs syncs. Doesn’t see reports or dashboards. |
| Journals & Eliminations Admin | Creates, edits and approves journals and eliminations, and opens Month End Status and the Elim. & Journals Report. Doesn’t see reports or dashboards. |
| Dashboard Admin | Views reports, and builds and changes dashboards. |
| Report Admin | Views reports, and builds and changes reports. |
A person can hold more than one role on the same organisation: add a second deployment with the other role.
2Know where the access applies
Access is given to one organisation. Someone added on Your Group can work with the group’s consolidated figures. To load data or work on Demo Sales Company’s own figures, they also need adding on Demo Sales Company. Apart from the account owner, nobody can open a company they aren’t deployed on.
Select the organisation in the entity selector before you open User Deployment: the page shows and changes access for that organisation only.
3Invite the person
- Select Your Group, and open Settings → Organisation Settings → User Deployment.
- Click Add Deployment.
- In Email address, type their work email.
- Under Access role, choose the role, such as Journals & Eliminations Admin.
- Click Add deployment.
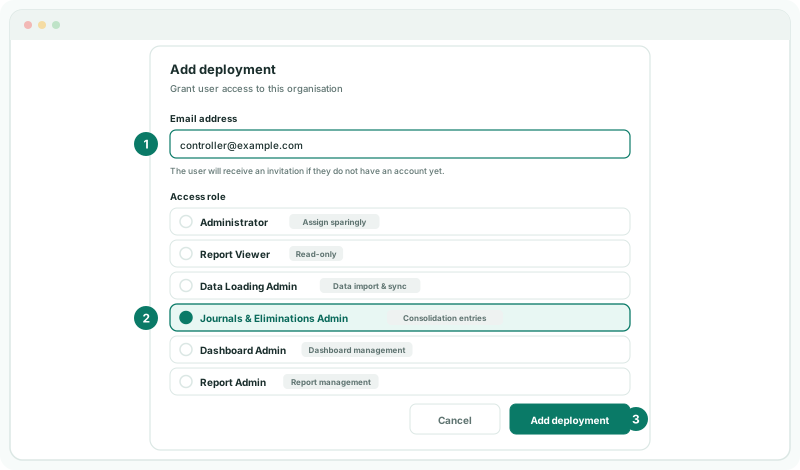
Someone new to BrizoConsol gets a Welcome to BrizoConsol email with a temporary password. Someone who already has an account gets no email: Your Group simply appears in their entity selector.
4Keep the list right
| Change a role | Click the edit icon on the row, choose the new role and click Save changes. |
|---|---|
| Send the invitation again | Click the envelope icon (Resend invitation). It shows only until the person activates their account. A new temporary password is issued and the previous one stops working. |
| Remove access | Click the delete icon and confirm with Delete Access. Do it on every organisation the person was added on. |
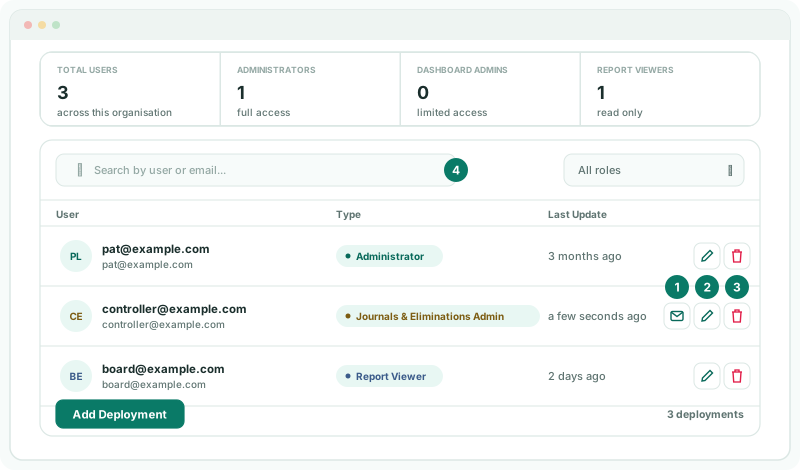
Use the search box and the All roles list to find people. Every deployment saved or removed is recorded in the System Audit Trail as settings.user_deployment_saved or settings.user_deployment_removed, with who did it.
Check
The person appears in the list with the role you chose, and after signing in sees Your Group in the entity selector and only the menus their role allows.
5If something goes wrong
| What you see | What to do |
|---|---|
| Subscribe to Deploy Users covers the page | The Free plan doesn’t include User Deployment. Subscribe to add users. |
| Add Deployment is greyed out, with Paid version is required to deploy to users. | The plan can’t add users. Upgrade the subscription. |
| Cannot add users | The plan’s user limit is reached. Giving another role to someone who already has access still works. |
| This user has already activated their account, so the invitation cannot be re-sent. | They already have a password. If they have lost it, they can reset it from the sign-in page. |
| The person can’t see a company | They are deployed on the group only. Add them on that company too. |
Want more detail? See the documentation